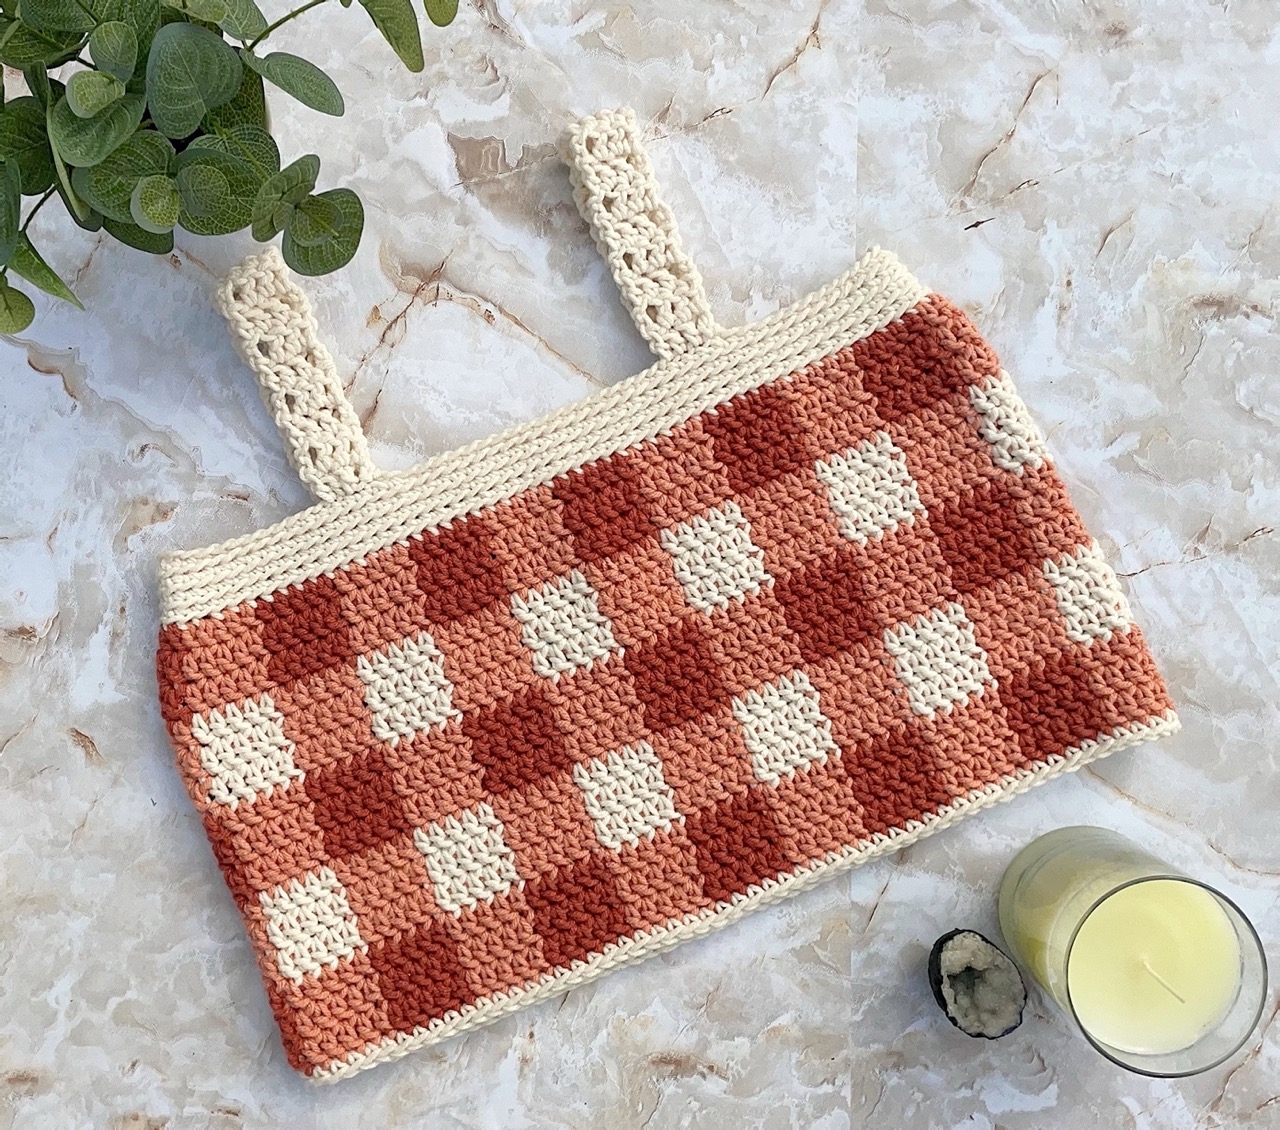
With summer fast approaching, I wanted to create a top with a cul-de-sac barbecue vibe and that’s how this gingham crochet top was born! The most challenging part of this pattern is the constant color changes, but it’s not too difficult once you get the hang of it. Check out the free pattern below!


Materials
- 5.5mm crochet hook
- Yarn Bee Studio 72 yarn
- Yarn weight – 4 – medium
- Colors – Ivory, Clay, Spice
Measurements
- underarms 86 cm
- bust 88 cm
Swatch
- 3 rows of 10 dc stitches
- 4.5 cm x 8.5 cm
- 1 st = .85 cm
Each gingham square will be 3 rows of 5 dc stitches
Abbreviations
- LY – Light yarn
- MY – Medium yarn
- DY – Dark yarn
- ch – Chain
- sl st – Slip stitch
- sc – Single crochet
- dc – Double crochet
- BLO – Back loop only
Notes
- Always sl st with the yarn color that you will chain with in the beginning of the next row. This will create a seamless color change between rows.
- To change color within a row, start the last dc of the first color normally. When there are two loops left on the hook, pull through with the new color.
- I made the top trim slightly smaller than the gingham body so that the top would fit snugly under my arms but still fit over my bust. This portion can be adjusted or ignored entirely.
- The number of stitches in the gingham body of the top can also be adjusted, as can the number of stitches in the square, but the number of stitches should always be a factor of 2x the number of stitches in the square to ensure the colors are always alternating. My gingham square is 5 stitches, so my number of stitches is a factor 10 (110)
- The ch counts as the first stitch
Pattern
Body
Row 0 – LY ch104, sl st into first chain to form a circle (104)
Row 1 – LY ch1, sc in each stitch, sl st into ch (104)
Row 2-6 – LY ch1, sc BLO in each stitch, DC sl st (104)
Row 7 – DY ch3, dc2 in sp, dc2, MY dc1, dc2 in sp, dc2, *DY dc5, MY dc5* repeat four times, DY dc1, dc2 in sp, dc2, MY dc1, dc2 in sp, dc2, DY dc1, dc2 in sp, dc2, *MY dc5, DY dc5* repeat four times, MY dc1, dc2 in sp, dc2, DY sl st (110)
Row 8 – DY ch3, dc4, *MY dc5, DY dc5* repeat until 5 st remain, MY dc5, DY sl st (110)
Row 9 – DY ch3, dc4, *MY dc5, DY dc5* repeat until 5 st remain, MY dc5, MY sl st (110)
Row 10-12 – MY ch3, dc4, *LY dc5, MY dc5* repeat until 5 st remain, LY dc5, MY sl st (on Row 12, DY sl st) (110)
Row 13-15 – DY ch3, dc4, *MY dc5, DY dc5* repeat until 5 st remain, MY dc5, DY sl st (on Row 15, MY sl st) (110)
Row 16-18 – MY ch3, dc4, *LY dc5, MY dc5* repeat until 5 st remain, LY dc5, MY sl st (on Row 18, DY sl st) (110)
Row 19-21 – DY ch3, dc4, *MY dc5, DY dc5* repeat until 5 st remain, MY dc5, DY sl st (on Row 21, LY sl st) (110)
Row 22 – LY ch1, sc in each stitch, bind off (110)
Straps
Place markers where you would like the straps to be
Row 1 – On the right side of one strap, sl st into the border, ch3, dc3 (4)
Row 2 – *ch3, dc3* (4)
*Repeat until you reach your desired strap length*
Last Row – Sew the strap to the opposite side of the top with sl st (4)
Repeat for the opposite strap
Let me know how it turns out in the comments below!

